Beginner’s Guide to Calligraphy

Calligraphy and photo taken by Zoe Nguyen
Calligraphy has taken note-taking and projects for students to another level. From artistic headers to writing a letter to a friend, hand lettering is a skill that anyone can learn and apply to a multitude of things. It can be extremely therapeutic and fun to do in spare time. If you are a beginner or looking for something new to learn during the pandemic, here are 5 helpful tips to get you started on your calligraphy journey!
Step 1: Materials
As a beginner, there is no need to buy expensive pens and markers. If not properly aware of how to do calligraphy, the markers can easily wear out before one learns how to properly use them.
If you already have access to brush markers, you can use them when going through this article, and if you are looking for a good brush pen to invest in, check out this article.
A cheap brush pen set achieves the look of calligraphy, and is incredibly beginner-friendly, is Crayola Washable Markers. It comes in a variety of colors, is very cheap compared to other pens used for calligraphy, and is easy to transition from once lettering has been mastered with this marker.
Step 2: How to hold the pen
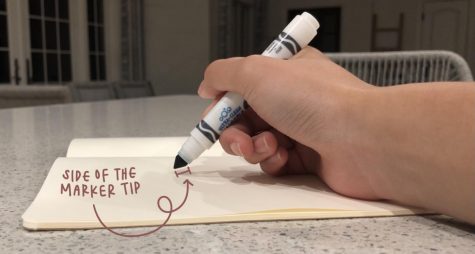
The first step of learning calligraphy is to master how to hold the marker. Try to hold the marker at a lower angle, in order to have better access to the whole side of the Crayola tip, and not just the very top. This will allow better differentiation of upstrokes and down.
Step 3: Understanding the concept with the use of patterns
The idea of calligraphy is to have thick downstrokes and thin upstrokes. In order to achieve an upstroke, normally draw a line moving upwards with normal writing pressure on the paper. For downstrokes, apply a little more pressure on the paper, guiding the marker in a downwards direction. This action should cause the side of the marker tip to be used (a slight bend to the fabric of the tip while applying pressure).
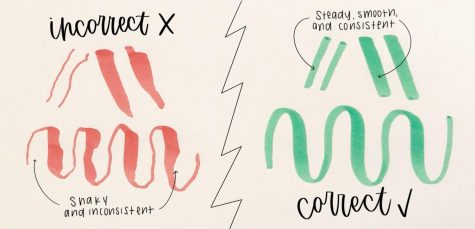
A common mistake that people make is correlating a thin upstroke to being a very light skim on the page. Upstrokes should be very steady, but do not have to be as thin as possible! If the upstroke is thick in your opinion, just make your downstroke thicker!
A good practice to use is the wave patterns presented in the photo above. The goal of this exercise is to consistently have steady upstrokes and thick and heavy downstrokes, along with ensuring the strokes maintain the same size.
Step 4: Starting to hand letter!
Calligraphy is not a skill learnt in a matter of minutes, and while this article offers guidance, practice is still key! It takes a while to understand and master the art of calligraphy, but once you understand the concept, it is an easy transition to learning a multitude of other styles of hand lettering.
One of the most common misconceptions is that calligraphy and cursive are relatively the same things. Even though cursive may look elegant and similar to calligraphy, the methods are very different.
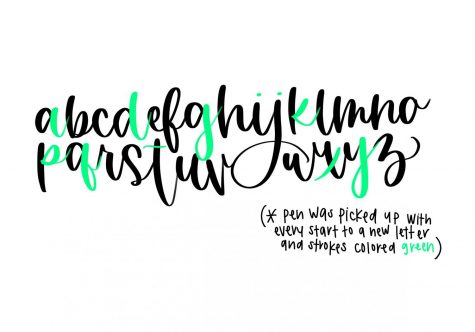
The main differences between the styles of writing is that picking up the pen multiple times is common in calligraphy and there are different ways to write each letter.
Learn to develop the mindset that generally, when writing in calligraphy, that you can pick up your pen after each and every letter, or even in the middle of it. In the figure above, it is evident where the pen is picked up mid-letter. This essentially achieves a more seamless and clean look. Picking up the pen avoids overlapping lines makes it easier to write longer phrases and words.
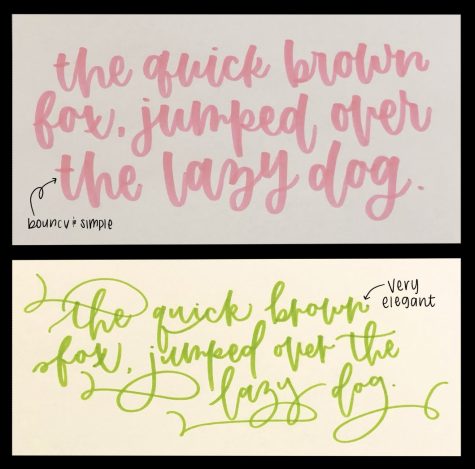
Step 5: Choose your style of writing
Having mastered basic calligraphy, one can choose from a variety of different hand lettering styles! Calligraphy is completely customizable to your preferences. There are a plethora of ways to write each letter, just figure out which suits best!

Zoe Nguyen is a senior, and the Editor-in-Chief of The Viking Press with an ardent passion for finance, calligraphy, and creative writing. Being...